The Blog Roll
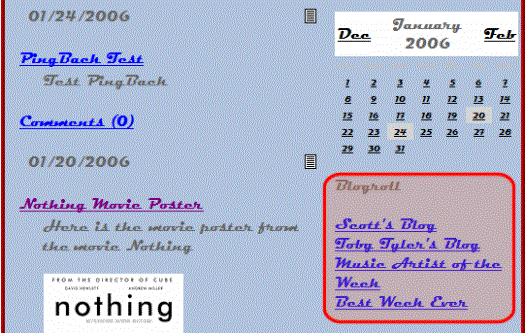
A blog roll lets you add a list of Web site links to your blog page. Think of this as a roll call of blog pages, a list of related blogs, or blogs that you want your visitors to view. Below is an example of a blog roll.

Note: Clicking a blog roll link opens the destination page in a new window.
Adding a Blog Roll Link
Follow these steps to add a blog roll link.
Note: To add a blog roll link from the Web site, you must be logged in.
1. In the Workarea, navigate to the blog folder.
or
From the Web site
- open the menu for the blog.
- click Properties.
2. Choose View > Properties.
3. Click Edit Properties ( ).
).
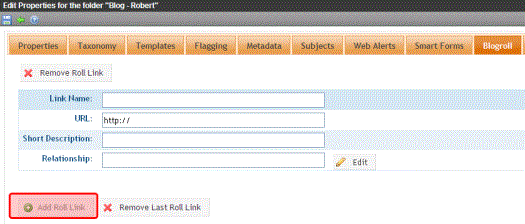
4. On the Blog Roll tab, click Add Roll Link.

5. The Add Blog Roll Link form appears.
6. Fill out the form according to the table below.
|
Field |
Description |
|
Link Name |
Describes the link in the blog roll. |
|
URL |
Enter the URL of the blog you are adding to the blog roll. It must begin with http://. |
|
Short Description |
Add a short description of the site. |
|
Relationship |
Enter the relationship of the blog roll link to you or to the site. For example, brother. Click Edit for a pop up screen that helps you choose the site's relationship. See Also: The Blog Roll |
The table below explains each relationship type.
|
Type of Relationship |
Description |
|
URL |
Check this box if the address is owned by the same person or company. |
|
Friendship |
Choose your level of friendship with the site owner. Contact Acquaintance Friend None |
|
Physical |
Check this box if you have physically met the person who owns this blog. |
|
Professional |
Check if the site owner has a work relationship with you. Select all that apply. Co-worker Colleague |
|
Geographical |
Select one. co-resident neighbor none |
|
Family |
If the site owner is a family member, select the relationship. Child Parent Sibling Spouse Kin None |
|
Romantic |
Check your feelings toward the site owner. Muse Crush Date Sweetheart |
7. Click Close.
Note: Add as many links to the blog roll as you would like. To remove a blog roll link, see Removing a Blog Roll Link.
8. Click Save ( ).
).
Editing a Blog Roll
To edit a blog roll link, follow these steps.
Note: To edit a blog roll link from the Web site, you must be logged in.
1. In the Workarea, navigate to the blog folder.
or
From the Web site
- open the menu for the blog.
- click Properties.
2. Choose View > Properties.
3. Click Edit Properties ( ).
).
4. Click the Blog Roll tab.
5. Find the Blog Roll Link for which the information needs to be edited.
6. Edit the information.
7. Click Save ( ).
).
Note: As with adding a blog roll link, you can edit multiple blog roll links before clicking Save.
Removing a Blog Roll Link
There are two ways to remove blog roll links.
Remove the last link that was added.
Remove any link in the list.
The steps to each task are documented below.
Removing the Last Blog Roll Link
Using this method to remove the last blog link on the page.
1. In the Workarea,
- navigate to the blog folder.
or
From the Web site
- access the blog’s menu from the site.
- click Properties.
Note: To remove a blog roll link from the Web site, you must be logged in.
2. Choose View > Properties.
3. Click Edit Properties ( ).
).
4. Click the Blog Roll tab.
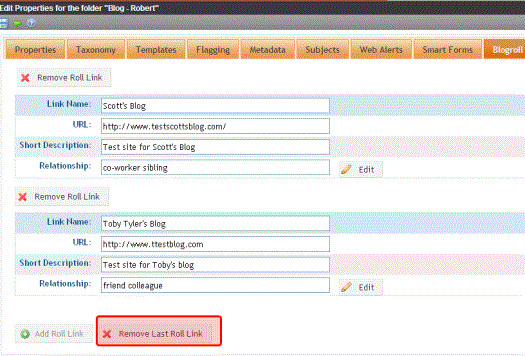
5. Click Remove Last Roll Link.

6. A dialog asks you to confirm.
7. Click OK to remove the last blog roll link.
Note: You can continue to remove links at the end of the list by clicking the Remove Last Roll link.
8. Click Save ( ).
).
Removing a Blog Roll Link
To remove any blog roll link on the list, follow these steps.
1. In the Workarea,
- navigate to the blog folder.
or
From the Web site
- access the blog’s menu from the site.
- click Properties.
Note: To remove a blog roll link from the Web site, you must be logged in.
2. Click View > Properties.
3. Click Edit Properties ( ).
).
4. Click the Blog Roll tab.
5. Find the blog roll link to be removed.
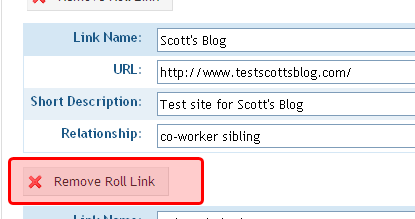
6. Click Remove Roll Link above the link to be removed.

7. A dialog box asks you to confirm.
8. Click OK to remove the blog roll link.
Note: You can continue to remove links by clicking the Remove link.


